Oh Acne,
I used to have acne. Not the ever-present-one-or-two-zits kind of acne. The tried-every-cream-set-antibiotic-birth-control-and soap kind of acne. Acne on my chest, acne on my back, and acne on my face.
Eventually, I took Accutane. For those of you who don’t know, Accutane is a high dose of vitamin A that minimizes the skin’s oil production. It also causes severe birth defects if you become pregnant, and gives you blisters if you’re in the sun too long. For the six months I took it, I was constantly asked if I had a sunburn. Although it was an exceptionally irritating experience, Accutane is responsible for my much-improved completion. After years of issues, I know the struggles that derive from extra oil, redness, bumps, scarring, and dry flaking patches.
Using highlighter runs the risk of aggravating acne, highlighting the bumps, clumping up on dry patches, and making skin look more oily in the worst of areas.
Before Highlighter…
- I recommend investing in an oil-absorbing powder and exclusively dusting your t-line prior to highlighter application.
- Using two foundations of the same color—a mattifying one in greasy areas and another in regular areas—isn’t such a bad idea either. Try to find brands that offer the same product in two formulas. This way you know the shades will match. My favorite foundation comes in both options. I switch to the combination/oily variation in the summer to avoid product slippage.
- Another technique is using a mattifying primer on your t-zone and leaving drier areas of your skin bare before applying your foundation. I suggest the Makeup Forever Mattifying Primer. Remember that you can always ask shops like Sephora for samples of products like foundation and primer. These products don’t come cheap so it’s best to test several options before splurging.
Choose a Highlighter
Use a light, fine powder. Liquid or gel highlighters can clump up on imperfections.
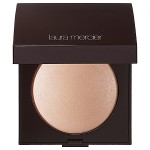
I personally love the Laura Mercier Matte Radiance Baked Powder Compact. It has the perfect amount of subtle shimmer, and it’s very fine—no clumping, smearing, or pieces of glitter here to catch in flaky patches.
The nice thing about using something with such a light texture is that it helps diffuse light and makes skin appear smoother. My second recommendation is the Hourglass Ambient Lighting Pallet. The pallet is pricey, but you can also buy singles! Every time I’ve worn this, I get compliments on how radiant my skin looks.
Apply
Use a regular dusting on areas like the cheekbones that are naturally less oily, and a more fine application on areas like the nose. Avoid applying directly onto zits. After the application, you can use a clean brush to blend the highlighter over any blemishes directly in the way. This will keep the application from looking patchy, and the zits won’t appear more raised than the directly-highlighted surrounding areas.


